Showing posts with label Style. Show all posts

Friday, 25 October 2013

Tribal Make-up Inspiration #3


Time for some more inspiration! An author and philosopher I respect named Tim Keller says this:

Read and listen to one thinker and you become a clone; 

read two and you become confused; 

read a hundred and you begin to develop your own wise voice.

This is true in so many ways. In something as simple as pouring over dozens of pictures of tribal make-up to find which colours and markings and details you love or might have meaning for you, instead of just copying your favourite belly dancer. Also in the dance itself, as much as you may want to emulate your BDH (belly dance hero) the world doesn't need another Rachel Brice or Zoe Jakes. They have their place. The world needs you to take YOUR place. Be the best YOU that you can be, and you can only be your best by discovering who you are. And you can't discover who you are by studying and copying just one person! You must listen to and watch and study MANY people and take what fits with you and release what doesn't.

Don't be a clone. Don't get confused. 
Keep learning and develop your own style, your own voice, your own best self. :)

Back to fun stuff now, enjoy these new pics! ;)


I love this last picture, the idea of incorporating white lines covered in black dots could be really interesting. Maybe we could have a how-to next?!? 

If anyone has tried any unique tribal make-up and would like to submit a picture to this blog, please email me at thetribalway@gmail.com

Have a great day everyone!!!


Friday, 20 January 2012

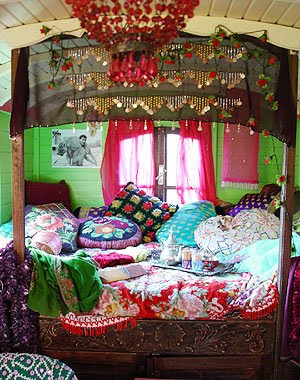
Tribal and Gypsy Inspired Decor

Be prepared to dream and drool.

Rich textiles, heavy fabrics, ornate decor, chandeliers and drapes and pillows and lanterns and knick knacks and jewelry and antiques and everything you need to be inspired to create your own little haven. :)


Outdoor+bohemian+paradise_large

Tumblr_l6p0bz1pa71qzd1t1o1_500_large

A_large


Thursday, 8 December 2011

Style Inspiration: Peacocks

This beautiful bird has always been admired. Its vibrant colours and impressive plumage have ushered the peafowl into various religions and cultures.  In Hinduism they are associated with the god Saraswati, standing for patience, compassion, knowledge. In Asian spirituality they represent Kwan-Yin as an emblem of love and good-will, and in Christianity they represent eternal life. They have a long history including a part in Greek mythology as well.

Regardless of their lore, the peacock is an awe inspiring creature whose dress we can borrow from to colour and influence our own styles in life and dance. 


Earth Dancer Feather Necklace - Custom Made -FREE SHIPPING- US, Canada and Australia


SALE Purple Peacock Nomad Feather Earrings by Bird Crap Featherwear

Tribal Fusion ATS Cowry Hair Falls,  Pisces

Thursday, 22 September 2011

Tutorial: Hair Flower


Flowers are beautiful to wear in your hair for dance, and for everyday as well. You can buy them in stores, but I find they're either really cheap (and really scruffy looking) or beautiful - and really pricey. Here is an easy way to make them yourself! Even better, it gives you a very sturdy hair flower, so it won't fall off after the first wear! ;)


You will need:
  • Flowers
  • Fabric
  • Large bobby pins
  • Glue gun and glue
  • Scissors
  • Sparkles and white glue (optional)


Step One:

Cut fabric to be a backing. The flowers I used had three main petals, so a triangle shape worked well. Depending on the shape of your flower you can use a square pattern instead. The brown piece of fabric (you can see the white reverse of it) is stronger, so it'll be the main backing. The pink will overlap in the back, so it has to have enough to fold over.

Here are some patterns to give you an idea - the red line shows you where to cut to be able to fold the fabric over the bobby pin.


Step Two:

As above, you will fix the backing onto the bobby pin. In picture one the pink is slid into place. In picture two you can see I've used the hot glue gun to keep it sturdy. In picture 3 I've glued the brown to the bobby pin and pink fabric. In picture 4 and 5 you can see I spread glue on the top and folded over the pink. Picture 6 shows the final base - secure and tidy looking.


Step Three:

Glue the flower on! You can wear it already, but I wanted to add a little extra sparkle to my flowers.


I used plain white glue and 'Crystal Snow' sparkles, both from Michaels. Put a line of glue wherever you want the flower to glisten. I just did the edges and very middle of each flower. Sprinkle the sparklies over your flower and shake the excess off. (Make sure to do this over paper so you can collect the extra and use them for the next flower!) Then just let them dry - and voila!


Below you can see how the flower looks before and after the glue dries. I love the extra shimmer!


Hope you've enjoyed this tutorial! If you have any requests let me know! :)


Tuesday, 20 September 2011

Headwrap Tutorial

  One of the key elements of an American Tribal Style belly dance costume used to be the Headwrap. Now it is not used quite as much anymore, but the skill of creating a beautiful headwrap should still be in any ATS dancer's arsenal. If you had a look at my Headwrap Inspiration post you will have a good idea of how they're supposed to look. In this post I will tell you the basics of how to actually create it! Enjoy :)


You will need:
  • Black broadcloth fabric - 3 yards (I think it would help to have a little bit of stretch, but either way)
  • Other accent scarfs of varying colours, styles, etc
  • Accessories - any jewelry, flowers, feathers, clips, adornments etc
  • You may want safety pins or sewing pins to fix some accessories to the headwrap


Now lets get started!

Step One:
Put your hair into a high bun as in picture a). If you have short hair, you will need clips and bobby pins to get your hair off your neck and forehead.

Step Two:
Take your broadcloth and fold it in half lengthwise. The folded edge will cover your forehead as in picture b). Make sure the rest of the length is even on each side.

Step Three:
Twist the fabric outwards. Make sure the twist begins at your hairline and is evenly taut on each side. (c).


Step Four:
Cross the lengths of fabric in the back and bring them out on either side in the front. (d).

Step Five:
Cross the fabric over your forehead as in picture e) and twist each piece around the other. It will look sort of like a knot, but really each length of fabric is just looped around the other.

Step Six:
Tuck the ends into the back of the headwrap, wherever it looks even and won't fall out.


Step Seven:
Choose another scarf or two, even hip scarves work, and wrap them around your head. Tuck the ends so it will not come apart.

Step Eight.
Fix any adornments you have such as flowers, feather or jewelry onto your head wrap. Done!

These last two steps are what really make the headwrap your own. You can match the colours to coordinate with the rest of your outfit, or choose a certain style to go for. Bright scarves will be very fun, flowers and feathers are eye-catching, and dark or monochrome colour schemes with more regal jewelry can look very elegant.


I hope this tutorial gives you a basic idea of how to put together your very own ATS Headwrap!

Beautiful silk fabric flowers provided by Sareen Dream - follow her on Twitter now too! @Sareen_Dream

Also, a big thanks to my beautiful littler sister for being my model :) She'll be helping me with more hair and make-up tutorials in the future!


Saturday, 10 September 2011

ATS Headwrap Inspiration

 
  A headwrap used to be a staple in ATS costume. They have since been mostly outdone by hair gardens and more simple updos, but a head wrap will always be classic ATS. In fact, the ability to make one is a skill that each American Tribal Style Belly Dancer should possess. You can count on a tutorial soon!

For today, however, let's admire some beautiful dancers who have employed the regality and exotic feature of a head wrap in their own costume. Take note of the black undercloth, the many styles and colours of scarves overtop, as well as the flowers and jewelry used to adorn the headwrap. Enjoy! :)